Question: What is a Router?
Setting up A linksys Router and Connecting Multiple PCs
Assumptions
That you at least know how to use the command line in Windows and If you connecting a Linux Pc the use of the terminal. All images can be clicked and viewed to see a larger image.
Required items
- Router Linksys 4 port
- At least 1 PC
Sections of this document
Articles of interest
Basic set-up
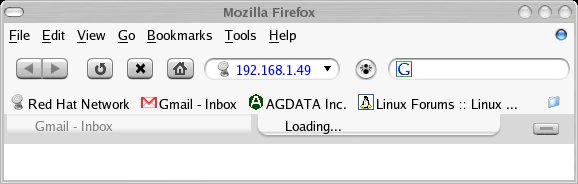
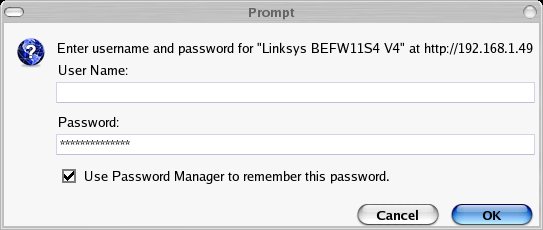
First thing we need to do is to log into our router. This is a very simple task as all we need to do is open up a web browser and type in the router's IP address. Depending if this is the first time setting this up, the owner's manual will give you the default IP address and username and password. See images below:
Once you gain access to your router, first thing we are going to do is change the admin password to something different. After you change the password, log back in with the new password and then we can continue on. The first page you will see is the Basic Set-up Screen. This lists the Internet Set-up and the Network Set-up. If this is your first time all this can look quite confusing. So we'll start with the Internet Set-up. All this is, is how you get your connection from your ISP (Internet Service Provider). As with mine I get a IP Address with DHCP From the ISP. So I choose the "Obtain IP Automatically". This is usually the standard way you will recieve your IP address from your ISP. See below:

Please note the tabs across the top of the page.
The Networking Section of the Set-up page is where you decide what you want and how you want your network to be set-up. The first option is whether you want to enable DHCP. This is the easiest option and easiest to set-up so you will want to enable DHCP. The next option is the Starting Address. THIS IS THE ADDRESS OF THE ROUTER. I highly recommend you change this to something other than the default. Note * all address will follow this IP address. E.g. Router IP address 192.168.1.30, PC 1 192.168.1.31, PC 2 192.168.1.32 and so on. With that out of the way and depending on how many PC's you have, you need to allow for at least 1-2 extra plus you PC's. So say you have 2 notebooks and a 2 desktops, I would suggest 5-6 addresses allowed. After your all done with these settings, at the bottom of the page is a "Save Settings" button. Now if you changed the router's address you will need to log into that address e.g in the web browser, type in the new address. If you don't have a wireless notebook or don't have a wireless router, then you can stop here.
Wireless Set-up
With your router Set-up page still open, click the Wireless tab at the top. You will then see something like this:

In this page we see a few options like Enable/Disable Wireless, Network Name and others. If you are going to use the wireless on your network, click the Enable option, then type in the name of the Network like Fishtank or something unique to you. The next option is the channel in which you'll broadcast you ESSID (the name of your wireless network). The default is usually good here. The last option is the one that will hide your ESSID. If you are in a pure Windows environment then you can hide it, I personally have had trouble with hidden ESSID in Linux. At this point, I would enable Broadcast. Once you have all these settings assigned click the Save button on the bottom of the page. Now if you look at the above image, you should see the sub title named "Wireless Security". Click that text and you will see the following page:

Here is where you set your Security settings. The first setting you will see is to enable security or not. Obviously you want to enable this. Second is the type of security, the easiest to set-up is the WEP Encryption. Choosing WEP, the next option is to choose what type of WEP encryption. Now I choose the 128 bit encryption because it is stronger than the 64 bit. The next box is the Hex Key generator. All you need to do here is type in a random collection of letters, nubbers and symbols. A example would be QhF6&z>+KfgbnQC* creates a Hex Key of 63DB08BB5CB8B011D2AA6B6833 After you type in the random text, click the Generate button and it will give you your 26 character Hex Key. This is the Key you need to have in order to connect to your router and hence to the Internet. So once you have your Key at the bottom, click the Save Settings button and you are done setting up your router's wireless. I would recommend saving your Key to a text file and save it some where safe.
Connecting a Linux Pc to your Router
This walk through should be very painless if all required software is installed. What you will need is the following. You should also be able to connect to the Internet or home network with the wireless Tools supplied with Fedora Core.
- A Wireless device (card, or internal)
- Network Manager
- Network Manager-Gnome
Lets see what we have installed. The easiest way to find out is go to Applications -> System Tools -> System Logs. Click the RPM Packages on the left and scroll through the list.

Make sure that you have the following:
- NetworkManager-0.3.3-1.cvs20050119.2.fc3
- NetworkManager-gnome-0.3.3-1.cvs20050119.2.fc3
These 2 are the latest as of this posting. If you don't have NetworkManager installed, you can install it with yum in the terminal. Type yum install NetworkManager NetworkManager-gnome into a terminal window.
Well now you are probably wondering how all this works and what to do next. So go to Applications -> System Settings -> Server Settings -> Services. In the window that opens up look for NetworkManager, check the box to the left of it and click the Start button. At the top, click the Save button. It is probably a good idea to reboot, so make sure no devices get started at boot and continue on. In a terminal window type NetworkManagerInfo. This should start the deamon and you should see a sweeping radar.
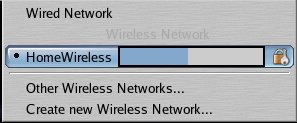
Depending on how you are connected, you might be disconnected from your connection because of NM. After a few seconds, you should be reconnected and be able to browse. If not, click "Other Wireless Networks" and type in the name of the wireless network:
If your AP (access point) is a secure AP, then you will be prompted to insert the Access key. If you use a WEP encrypted AP try the dropdown list in the messagebox and choose the Hex option. If you ever change your AP key, open up Gnome-conf editor in Applications -> System Tools -> Configuration Editor and drill down to /system/networking/wireless/networks/yournetworkname and you can change the key.
I hope this was helpful and you can conviently change between network devices rather painlessly. To read on how NM works visit "How it works".
Thank you Jim!
This page was generously written and donated to the community by Jim
Lawrence.
* Content Last Updated 2005-08-02 by Jim Lawrence
* Minor Grammer Last Updated 2008-02-24 by Dotan Cohen
* HTML Last Updated 2008-02-24 by Dotan Cohen